Showing posts with label paper. Show all posts

Friday, February 6, 2009

More Creative Book Designs

Hugs by Thomas Keeley

No matter how much the digital age expands, we will never rescind our love for books. Books are an integral part of human history and they continue to play an important role in shaping our culture. Today, their usage shifts from an instrument of information storage to a much more versatile design medium. Earlier this week, I showed you the well-designed ABC3D and today I will share with you a few more contemporary creative projects that reinterpret the book's look and its uses.


Hugs by Thomas Keeley (via)

Thomas Keeley makes modifications to everyday objects and turns them into art. His statement here? Who knows—perhaps that books love each other as much as we love them.

Book Ring by Ana Cardim (via)


Books as jewelry? The book ring by Ana Cardim is interesting because most people do not intuitively (if at all) associate books as something that can be worn. I think that truly innovative design defies any preconceptions we may have with a pre-existing object and takes it in a whole new direction.

The Neiman Marcus Pop Up Book (via)


DIY Matchbook Notepads by D*S

I really like this creative notepad project from Design*Sponge. It's simple, useful, and a creative way to reuse scrap paper. It reminds me how much fun making a booklet can be. Why are they called matchbooks, when they only carry matches? To me, this easy DIY is a better use of the term "book."

Saturday, January 10, 2009

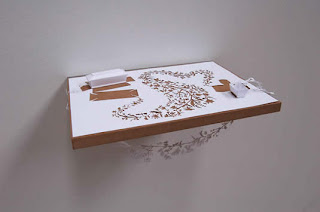
The Tragic Paper Sculptures of Peter Callesen

White Hand by Peter Callesen

In the spirit of paper art this week, look at these paper sculptures created by Peter Callesen, made with plain A4 sheets. He likes the A4 size because it is the most common medium for transmitting information and most people never notice its materiality. His uses inspiration from fairytales and the contrast between dreams and reality to craft delicate sculptures that bring to the attention to the frailty of the paper.

Looking Back by Peter Callesen

Peter uses these blank white paper sheets to explore the possibilities between the 2- and 3-dimensional. While we may first see the 3-dimensional sculpture, we also notice that the it is left bound to the paper and can be contrasted with the negative 2-D cut-out shape it leaves behind.
All in All by Peter Callesen


What impresses me about Peter Callesen's work is his ability to execute so intricately these abstract concepts using such a simple and seemingly mundane medium. I am inspired by his dexterity and patience to manipulate the 2-D shapes into astonishingly detailed 3-D sculptures. You can check out more of his work, as well as his paper installations that are much MUCH larger than the standard A4 at his website below.

Snowballs by Peter Callesen

Distant Wish by Peter Callesen

One thing I find interesting in the work featured in this and the last post is how these two artists utilize the versatility of paper differently. I've been drawing for such a long time now, but I've never really thought too much about the medium I draw on—paper. There are so many things we can do on paper, but now I find that there are even more things we can do with paper! Artists like these inspire me to do more crafts and make more things with my hands.

Eismeer (detail) by Peter Callesen

Besides drawing in 2-D, what kinds of crafts do you like to do? What kinds of things do you want to do more of? Would you like to see more projects on this blog like the snowflake one?

Impenetrable Castle by Peter Callesen

Related links:


Wednesday, January 7, 2009

Yulia Brodskaya's Papergraphic Illustrations

Artwork by Yulia Brodskaya

I am completely inspired by Yulia Brodskaya's beautiful papergraphic illustrations. The playful swirls flow in and out of the type, creating depth and dimension, even with just white paper.


I find it clever how she disguises some of the text in seemingly arbitrary swirls. Her use of three-dimensional negative space creates fun textures and layers, while her remarkable colors and whimsical curves shape amazingly complex and beautiful works of art.

Yulia's papergraphic illustrations remind me of the endless possibilities of a given medium. She is a talented designer who inspires me to use more bold colors and to design using simple everyday materials.

How do you integrate color into your art? Are they vibrant or muted? Is there such thing as too much color? (Is the image below too busy?)


Related links:


Monday, January 5, 2009

DIY: Crystal Snowflake Ornaments

Here is a fun mid-January craft project you can do with your family, friends or kids! If you are lucky enough to live somewhere where the temperature drops below freezing at night, or if you have freezer room to spare, you can turn simple paper cut-outs into (ice) crystal ornaments!

When I was little, I would cut paper snowflakes with my mom during the winter, place them in a bowl of water, and wake up the next morning to find beautiful iced snowflakes that we could hang around the porch. Since I am spending the holiday season in a place with snow, I thought this was a good chance to make a fun evening and revive a bit of my childhood.

In this blog post, I will show you how to make these simple, inexpensive, and ephemeral ornaments, the same way I made them when I was a kid.

Materials you'll need:
  • Paper (white or colored—we used mostly white here)
  • Scissors
  • String (scrap pieces of yarn or ribbon—about 4 or 5 inches each is enough)
  • Tupperware or bowls (needs to withstand water freezing in it—I recommend plastic ones)
  • Water
  • Cold weather! (or freezer space)

Step 1—
Cut your paper into squares or circles roughly the diameter of the bowls you'll be using.

Step 2—
Fold the pieces symmetrically about the center.
  • To make a four-pointed snowflake, fold the paper in half one way, then in half again the other way (so you end up with a square).
  • To make a six-pointed snowflake, first fold it in half, then fold it in thirds.
  • In the picture below, I folded the paper in sixths, then in half again in order to cut symmetrically on each side. When you open it up, it will look like a pie with 12 slices.


Step 3—
Cut a design! Keep in mind how the paper connects where the folds are. I recommend something pointy at the top, and a few arbitrary triangle holes.


As you open it up, you will be able to see the symmetry unfold!


Experiment a little! Your first snowflake will not be perfect, so don't worry if it doesn't come out the way you wanted it to! Remember that each snowflake is beautiful and unique.


Step 4—
  • Grab a couple of plastic bowls and fill them with about 1/2 to 1 inch of water.
  • Submerge your unfolded snowflake. It will want to sink, but that won't make much of a difference in the end product.
  • Dip the ends of your piece of string such that it forms a loop in the water. In the image below, I tied a short piece of ribbon in a loop and submerged the knot in the bowl, leaving the loop out.


Step 5—
Place them outside! (If you live in California or other temperate climates, try your freezer space.) Check to see that your string has not shifted during the migration.

In the morning, you will (hopefully!) find frozen ornaments that you can hang around outside if the temperature stays cold enough.


To our readers: Liked this project? Tried this project? Let us know! We would love to see your finished products. Leave us a comment and be sure to link your photos too!


Don't be surprised if your neighbor's cat finds them tasty... it happened to us!